Understanding and Fixing Blurry Photos
Blurry photos can occur for a number of different reasons. Before you can fix the blurriness in your photo, you must first understand what is causing it. In the digital age, where we have access to instant previews of our photos, it is often quite easy to pinpoint the cause of the blurriness. The photo preview on your camera is an important feature and will provide you with instant feedback on how your photo has turned out. Remember to always zoom into the image to look at it in more detail as the small image will always look deceivingly sharp on the LCD preview screen.
If you notice that your photo is blurry, then you need determine the cause of the blurriness. Here are the usual causes of blurry photos –
1) Blurry Photos from Camera Shake

Fixing Blurry Photos – Camera Shake
Identifying the type of blurriness
Blurriness caused by camera shake is often quite easy to identify. The foreground and background of your image will appear to be blurry and nothing within the photo will appear sharp at all.
Cause
Camera shake is often caused by using slower shutter speeds. As the opening of the lens is opened, your camera is moving/shaking around, thereby resulting in a blurry photo.
Solution
The general rule of thumb that we use to minimize camera shake is to use a shutter speed that is faster than 1/’camera lens length’. So if you are using a 105mm macro lens, you need to ensure that the shutter speed is greater than 1/105. Using a shutter speed slower than this will often result in blurriness caused by camera shake.
2) Blurry Photos from Incorrect Focus Point

Fixing Blurry Photos – Incorrect Focus Point
Identifying the type of blurriness
Blurriness caused by incorrect focus point can be easily identified. Here, the subject of your photo is not in focus and appears to be blurry. However, another spot within the image is in complete focus and is sharp.
Cause
Blurriness caused by incorrect focus point occurs as a result of focusing on the wrong thing in your image. If you are using the auto focus point feature in your camera, it generally means that you have accidentally selected the wrong focus point or the camera has not focused onto the right area correctly. As you can see from the image on the left, the auto focus point has been set to the green leaves/grass. As a result, the green leaves/grass is in focus and our flower subject appears to be blurry.
Solution
Blurriness caused by incorrect focus point can be fixed by ensuring you are focusing onto the right area. If you are using auto focus points, then it is as simple as moving the auto focus point over the subject area that you want to be in focus before you take your shot. If your camera has trouble focusing onto the subject area, we suggest you move to a different view point or manually focus.
3) Blurry Photos from Subject Movement

Fixing Blurry Photos – Subject Movement.
Identifying the type of blurriness
Blurriness caused by subject movement an be quickly identified. Here, everything appears to be in focus with the exception of your subject. There will be a trail/shadowy duplicate of your subject within the image. This gives the viewer the perception of movement.
Cause
Blurriness from subject movement is often caused by a number of factors. If we are dealing with inanimate objects such as flowers, then this is often caused by the wind. If we are dealing with bugs, then this is actually caused by the movement of the bug itself! However, the true caused of the blurriness is the shutter speed. Essentially, the shutter speed you are using is not fast enough to freeze the motion.
Solution
By increasing your shutter speed, you will be able to freeze the motion. You may also wish to consider using a flash to help you freeze the motion of your subject.
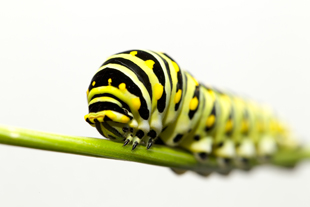
4) Blurry Background Photos

Fixing Blurry Background Photos – Bokeh
Identifying the type of blurriness
Blurry backgrounds are commonly used in macro photography to help focus a viewer’s attention onto your subject. It adds a creative effect onto your photo.
As such, your subject will be in complete focus and the background of your image will then appear to be blurry.
Cause
Background blurriness occurs when you are using a large aperture setting on your camera. eg. f/2.8.
Solution
To eradicate the background blur, you will need to lower your aperture setting on your camera. For example, rather than using an aperture of f2.8 you will want to ensure you use a much smaller aperture such as f/22. This will usually bring the whole image into focus then.
Armed with all the above knowledge on fixing blurry photos, you can now say goodbye to blurry photos forever. As always, remember to share this with your friends and family by clicking on the SHARE button.
Improve your skills with this Photography Masterclass: