Water Drop Collisions Photography Tutorial (Part II)
by Greg Easter (Natures Pic Photography)
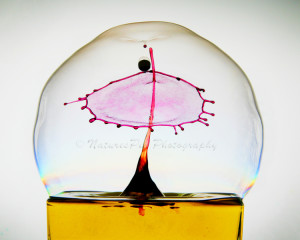
Water Drop Collision by Greg Easter
I was so amazed on how the water drops turned out, I started wandering through the internet to see if I could find more ways to have fun with water drops. There it was … a whole other world out there where water drop collisions were being made.
I first had to buy some equipment to help me along the way. Google ‘Stopshot’ or www.cognisys-inc.com and it will take you to the website where I purchased my equipment. Through watching, and A LOT of trial and error, I was able to produce a lot of abstract art. Every time I go into my little studio, I am amazed what the outcome is. Believe me; I don’t produce works of art every time I download my images from a session. I may take anywhere from 200 to 500 images and maybe have a few I can work with. However, those few are REALLY COOL!!!
Equipment
- Camera with a zoom lens. I used a 180mm macro.
- Tripod and cable release.
- Flashes. I use a Macro Twin Lite MT-24EX. Also a Canon 580ex Speed Light.
- The Cognisys StopShot, which includes the following equipment. StopShot module High Precision water valve with matched nozzle Mariotte Siphon (to hold the water)
- Mini beam sensor and mounting hardware
- Tripod mountable bracket for holding the siphon and water valve up
- Power supplies for both the water valve and StopShot (Cost of this equipment is approximately $400.00 US. To me, it is well worth the expense)
- Color gels to put on the flashes.
- A long shallow water tank 3 feet x 1 foot by 2 inches high.
- Lots of food coloring in many different colors. This is for the siphon and the water tank.
- Guar Gum. This is used in the Mariotte Siphon. Mixed with just the right ratio of water which thickens the liquid to make it more elastic or stringy so to speak.
- A ruler and a brass fixture that I use for focusing. (I will explain in my short video)
- Paper towels.
- A stand that holds the siphon and sensor.
- WATER and PATIENCE
Now it gets a little tricky…
httpv://www.youtube.com/watch?v=MndGi77SvD0
As you can see, the water drop collision set up is a bit different from the water drop setup. I wanted to construct something more permanent. Now when I want to produce images, all I have to do is set up my camera, fill my tank with water and make my mixture of water and guar gum. The ratio of water to guar gum what I use is about 1 liter of water to 1 teaspoon of guar gum, depending on how thick you want the water. Before you use the mixture you should strain it. I use an old nylon sock and a piece of cheese cloth. It takes out tiny little bits.
I then set up my camera by putting it at an angle so I can capture the image a nd also the reflection in the water. The camera is set in Bulb mode. Same lighting as the water drop set up, very low light. In this situation the flash is your exposure. I set the flash to manual and anywhere from 1/16 to 1/32. The softer the flash the faster the exposure. This will freeze the image. My aperture is set anywhere between 11 and 18. The ISO is between 400 and 800. I shoot in RAW but you can use jpeg also.
To focus in on the drop, I first put a yardstick across the tank where the drop is going to hit. I then take the brass tube and set it on the yardstick. I will then release droplets of water over the brass tube moving it until it hits dead center. You will hear a popping noise. Focus in on the brass tube then switch to manual.
My tank and Mariotte siphon is ready, camera ready and the flash is ready. Now all I have to do is program some settings on my StopShot module. Settings are as follows;
- How many drops
- How big the drops
- How close together “the drops”
- When the flash is to go off
- This is how it happens…
 I press my cable release on the camera, press the button on the module to release the water drops. The water drops descend down through the sensor which will tell the flash when to go off. One droplet will hit the water, then bounces back up to make a pillar. The second droplet collides with the first, the flash goes off then you depress the cable release.
You have to remember there is nothing set in stone or water for that matter. It took me a lot of time and PATIENCE to produce these cool looking abstract water drop collisions. It turned out to be a lot of fun for me. That is the key words, FUN & PATIENCE.
If there are any questions on this tutorial, please ask and I will be more than happy to answer them. By the way, my name is Greg Easter. I can also be reached on my website –
www.facebook.com/naturespicphotography
To find out more about the kind of equipment required for water drop collisions, check out the water collision photography kit on Amazon –