Understanding Exposure – Histogram In Photography
Today we will be introducing you to the histogram in photography. Before you read this article, please make sure you have read our other post on the ‘Exposure Triangle’ first as it will cover off the different factors that affect a photo’s exposure.
What Is The Histogram?
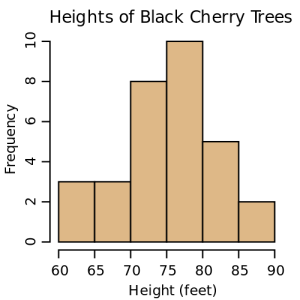 In statistics, the histogram is a graphical representation of the distribution of data. If you look at the picture on the left, you will see that a histogram has been used to depict the number of cherry trees (the numbers on the vertical line/axis) and their relevant height (the horizontal line/axis). For example, from the diagram, we can easily see that there are:
– 3 trees with a height between 60 and 65 feet
– 10 trees with a height between 75 and 80 feet
In photography, the histogram is used in the same way. On your vertical line/axis it is measuring the frequency / amount and on the horizontal line/axis it is measuring the different shades of black(darkness) and white(brightness) in your photo. In the histogram below, you can paint the following story about your photo –
- Very few ‘Black’ areas
- An increase in ‘Dark’ areas
- Much more ‘Medium’ areas
- Around the same amount of ‘Light’ areas
- Very few ‘White’ areas
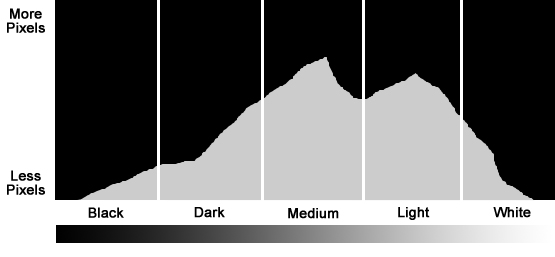
Photography Histogram Example
Why Use The Histogram?
By looking at your histogram, you can quickly and accurately tell whether your photo is over exposed or under exposed. When your photo is under exposed, it basically means that you have a loss of detail in the shadows (darker areas) of your photo. On the other hand, when your photo is over exposed, it means that you have loss of detail in the highlights (brighter areas) of your photo.
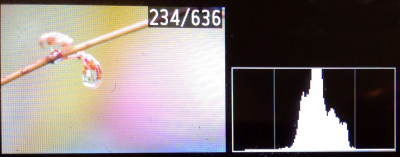
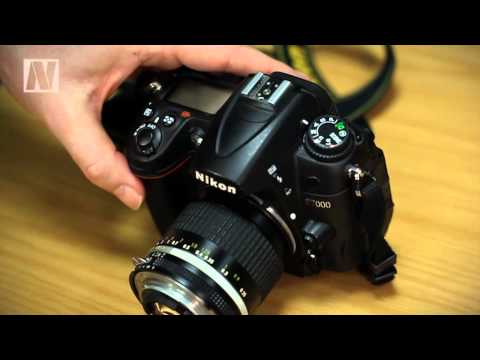
Histogram on the camera’s LCD
In the past, you may have relied on previewing the image on the LCD screen on the back of your camera to determine if the photo looked too dark or too bright. It is important to note that the image that you see on the LCD can often be quite deceiving. For example, on a sunny day, it can be quite hard to see the image on your LCD. Think back to a time when you thought you had taken the perfect shot (by looking at the LCD preview), only to find out that the photo looked under exposed when you viewed it at home on your computer screen. To avoid these situations, ensure you use the histogram as it will give you the best indication of your photo’s exposure.
How To Turn The Histogram On?
Many of the current camera models have the capability for you to view the histogram after you have taken your photo. If you have a Canon or a Nikon camera, here are the instructions on how to turn on the histogram –
Canon Cameras
- Press the Playback button
- Cycle through the different displays available by pressing the ‘DISP’ button until you see a picture of a histogram.
Nikon Cameras
- Press the Playback button
- Cycle through the different displays available by pressing the up/down button on the 4 way controller/navigation pad until you see a picture of a histogram.
What To Avoid
Generally speaking, there is no such thing as a ‘Bad’ or a ‘Good’ histogram. As the photographer, you may want to under expose or over expose an image to produce a specific effect. At the end of the day, the old saying of “Beauty is in the eye of the beholder” holds true. Having said that, there are some things that you should try to avoid.
For normal situations, you should try to minimize histograms that are –
- Heavily skewed to one edge of the histogram
- Cut / clipped at the far edges. When the histogram is clipped, this basically means that there is a loss of detail within your photo. eg. If the left of the histogram is clipped, there will be areas that are completely black and missing detail. If the right of the histogram is clipped, there will be areas which will be completely white and missing detail.
If you talk to many photographers, they will typically aim for a histogram that is generally skewed more towards the right, hence the popular saying of “Shoot to the right”. Here are some examples of the different exposures and their relevant histograms to give you an idea of how the histograms look like –
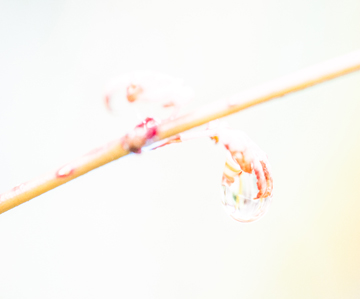
1A) Under Exposed

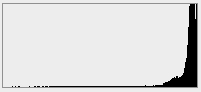
1B) Histogram Skewed To The Left With Clipping – Under Exposed
2A) Over Exposed
2B) Histogram Skewed To The Right With Clipping – Over Exposed
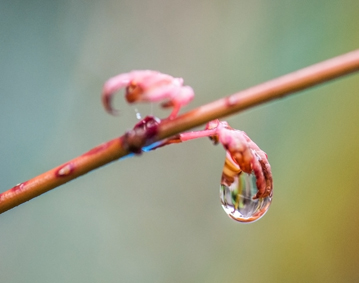
3A) Expected Exposure
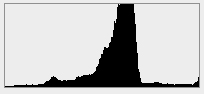
3B) A histogram for a good exposure usually spreads across the histogram and is typically skewed more towards the right
How To Fix Under exposure / Over exposure?
There are a number of ways to adjust an under exposed or over exposed photo on your camera.
The Quick Method
Most cameras have the ability for you to easily adjust the exposure by using the ‘Exposure Compensation’ function. This generally looks like a ‘+/-‘ button on your camera. To adjust it, you will need to press the +/- button and turn your control dial either to the left or right (at the same time). If your image is currently looking very dark, you can turn the control dial to the left. When you then take your next shot, this will then adjust the exposure of the photo to make it brighter. If your image is looking very bright, you can turn your control dial to the right. When you take your next shot, it will then adjust the exposure of the photo to make it darker. The exposure compensation feature can be adjusted to a number of different levels (0.3, 0.7, 1.0, 1.3, 1.7, 2.0, etc). When you adjust your dial to the left and right you will see the different levels. The best way to learn is to try taking a photo at different exposure compensation levels and see the impact that it has on your image and histogram.
NOTE: The setting remains at the exposure compensation level you have set until you reset/adjust it back to 0.0. So all your photos will be taken with the set compensation setting until you change it. So remember to change it back once you are done!
Other Method
The more fun way to adjust your under exposed or over exposed photo is to do it the manual way. Make sure you read our ‘Exposure Triangle’ article to learn more about the factors that affect your exposure. In a nutshell, , if your photo is currently under exposed, you will need to allow more light into your camera. This can be achieved by opening up your Aperture, or bumping up your ISO or using a longer shutter speed. If your photo is over exposed, you will need to reduce the amount of light into your camera. This can be achieved by closing your Aperture, or lowering your ISO, or using a quicker shutter speed. Once you have done so, make sure you check your histogram to see how it looks.
We hope that this article on histogram in photography will help you when you take your next photo. As we said earlier, there is no such thing as a bad or good histogram. It really depends on what you want to achieve as a photographer. At the end of the day, the histogram is a tool that will allow you to quickly identify whether the photo has achieved the exposure that you are after and allow you to identify if there are any detail loss in your photo.